Installing the PHP redis extension on Mac OS X
Recently I took a look at Redis, a popular and advanced key-value store. Peeking at the supported languages section of the project's website you'll notice a lot of client libraries available for PHP. Two out of them caught my particular attention: Rediska due to it's impressive Zend Framework integration and phpredis as it's a native PHP extension written in C and therefore supposed to be blazingly faster than vanilla PHP client libraries. The following blog post will show how to install and configure the aforementioned, native PHP extension on a Mac OS X system.
The next steps assume that you've installed redis on your machine. In case you are using MacPorts and haven't installed the key-value store yet, all it takes are the following two commands and you're good to go. In case you prefer Homebrew for managing your package/software installations, there's also a Formula for redis available that allows you to install it via brew install redis.
sudo port install redis
sudo launchctl load -w /Library/LaunchDaemons/org.macports.redis.plist
The very first step for building the native PHP redis extension is to get the source code by cloning the GitHub repository of the extension without it's history revisions.
mkdir phpredis-build
cd phpredis-build
git clone --depth 1 git://github.com/nicolasff/phpredis.git
cd phpredis
The next task is to compile the extension with the following batch of commands.
phpize
./configure
make
sudo make install
The next to last step is to alternate your php.ini, use php --ini | grep 'Loaded' to get the location of it on your system, so that the redis module/extension is available to your PHP ecosystem. Therefor simply add extension=redis.so in the Dynamic Extensions section of your php.ini. Afterwards you can verify that the redis module is loaded and available via one of the following commands.
php -m | grep redis
php -i | grep 'Redis Support'
To make the extension also available to the running Apache PHP module you'll need to restart the Apache server. Looking at phpinfo()'s output in a browser you should see the entry shown in the next image.

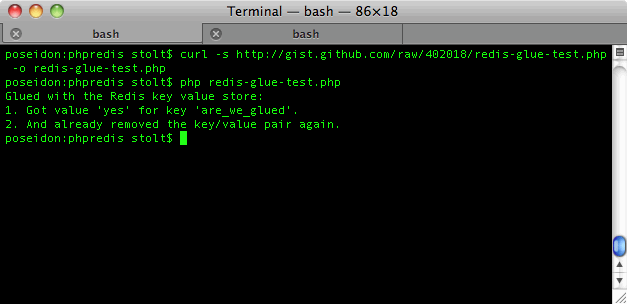
For testing the communication between the just installed redis extension and the running Redis server, I further created a simple test script called redis-glue-test.php you can fetch from GitHub and run via the next commands.
curl -s http://gist.github.com/raw/402018/redis-glue-test.php -o redis-glue-test.php
php redis-glue-test.php
When you see the following shown console output you're good to go. Happy Redising!

7 comments:
Nicely done, no issues at all with your instructions.
Now I have a lovely NoSQL install to call my own!
Thanks for the great tutorial. What did you wind up using redis for?
The intention was to write a Zend Framework and Redis based URL shortener, but haven't come that far yet. Though it's still on the want to do list ;D
Thanks for documenting this, it was very useful.
Great article! But why I can't see Redis on phpinfo's page???
Did you restart the webserver?
@Raphael: I restarted webserver but it doesn't show redis info on phpinfo's output. However, I checked with
php -m | grep redis -- it show redis
php -i | grep 'Redis Support
-- it show Redis Support => enabled
Post a Comment